In the latest update of Honkai: Star Rail, players are introduced to a sprawling new area known as "Sanctum of Prophecy" Janusopolis, located within Amphoreus. This vast setting is crucial to the backstory of Tribbie, and it features an intricate layout of 3D rooms that are ripe for exploration. As adventurers delve into this new zone, they will encounter numerous treasure chests and the highly sought-after Stellar Jades.
There are 59 treasure chests to discover, which include puzzles tied to prophecy tablets, golden scapegoats, and spirithiefs. To maximize your treasure hunting efficiency, it is advisable to complete the trailblaze mission titled "Light Slips the Gate, Shadow Greets the Throne." This ensures that all gates are open and accessible in the game.
To help players locate these treasures, here’s a detailed guide on where to find them in Janusopolis:
Begin your adventure by engaging with Priest Montta in the Archive of Prophecies to initiate the Janus' Maze mission. Completing the associated puzzles will net you the first 12 treasure chests.
-
Treasure 13: Utilize the Theophany Altar Space Anchor, head south, and access the hidden room via the Janus' Hidden Passage to uncover the next chest.
-
Treasures 14-16: After warping back to the Archive, turn around to solve a prophecy tablet puzzle that will open a gate and reveal two more chests, along with a golden scapegoat puzzle.
-
Treasure 17: Exit this room, descend the stairs, and continue west for another treasure chest.
-
Treasure 18: Ascend to the second floor, heading southeast at the corridor's end.
-
Treasure 19: On the third floor, make your way southwest for another chest.
-
Treasure 20: A spirithief will pilfer the previous chest; use Oronyx’s ability to reclaim it along with some Stellar Jades.
-
Treasure 21: Teleport back to the Archive, head to the basement, and find a chest hidden behind the spiral staircase.
-
Treasure 22: Enter Tribbie's room and search the bedroom for a basic treasure.
Next, navigate to the 3D room via the Hidden Passage of Contemplation, which features three levels with a unique day-night cycle.
-
Treasure 23: Ensure the space-time is set to Evernight when you enter; the second floor on the left holds a prophecy tablet puzzle.
-
Treasure 24: Repair the broken bridge with Oronyx’s power to access another chest.
-
Treasure 25: Go down to the lower floor and illuminate the stairs with a miracle orb to find a chest hidden underneath.
-
Treasure 26: Ascend again, switch the space-time to Dawn, and locate a golden scapegoat puzzle in the corner near the Tome of Miracles.
-
Treasure 27: Control the hand of Zagreus in the middle of the room to collect three coins of whimsy, unlocking a hidden treasure.
Continue exploring:
-
Treasure 28: Shine the miracle orb on boxes at the lower level and proceed to the end of the path for another chest.
-
Treasure 29: On the same level, navigate past two enemies to find a chest concealed behind breakable shields.
-
Treasure 30: Cross to the right scale to ascend to the third floor where the next chest awaits.
-
Treasure 31: Activate the first miracle orb to illuminate a passage leading to a golden short spear, then complete its puzzle for rewards.
-
Treasure 32: Traverse the hand of Zagreus acting as a bridge to uncover another chest.
-
Treasure 33: Use the illuminated Janus' Hidden Passage, switch to Evernight, and find a chest near the right scale.
-
Treasure 34: Finally, access a small room via the illuminated passage for a valuable treasure.
As you continue your journey:
-
Treasure 35: Teleport to Destiny's Gate Space Anchor for a chest behind the waypoint.
-
Treasure 36: Proceed west, descend the stairs, and solve a prophecy tablet puzzle for another treasure.
-
Treasure 37: On the balcony, grab the golden short spear and complete its puzzle.
-
Treasure 38: Access a hidden area through Janus' Hidden Passage, where a chest awaits.
-
Treasure 39: A spirithief will appear; use the hand of Zagreus to break boxes and capture it.
-
Treasure 40: Collect coins of whimsy and uncover another hidden chest.
-
Treasure 41: Visit the Janus' Hidden Passage to complete a formidable foe challenge for more treasure.
-
Treasure 42: Warp to Worshiper's Footpath Space Anchor and check west for another chest.
-
Treasure 43: Use the elevator near the previous waypoint to find a chest below.
-
Treasure 44: Complete the nearby golden scapegoat puzzle for rewards.
-
Treasure 45: Cross the hand of Zagreus bridge to collect another chest.
-
Treasure 46: Repair a broken bridge to access a chest beneath it.
In the final stretch, explore the last two 3D rooms:
-
Teleport to Worshiper's Footpath Space Anchor and enter the southern room. Ascend to the second floor and activate the miracle orbs.
-
Treasure 47: Follow the path past the miracle orb, utilizing Janus' Hidden Passage for a chest.
-
Venture to the bottom floor, cross the illuminated bridge, and purify the black tide.
-
Treasure 48: Reverse the space-time to Evernight and locate a chest behind a pillar.
-
Treasure 49: Ascend again, fix the bridge, and grab the precious chest at the center.
-
Treasure 50: Use the illuminated bridge to find the last treasure in this room.
-
Treasure 51: Teleport to Calyx (Golden): Bud of Memories for a chest by the flower.
Finally, head east from Worshiper's Footpath Space Anchor toward the last 3D room:
-
Treasure 52: Find a chest on the right side before entering.
-
Treasure 53: Inside, change the space-time to Evernight for a treasure near the entrance.
-
Treasure 54: Cross the bridge for another chest on the left.
-
Treasure 55: Use a miracle orb to illuminate an area before changing to Dawn for a hidden chest.
-
Treasure 56: Control the hand of Zagreus to unlock a bountiful treasure.
-
Treasure 57: Turn left from this position to discover yet another chest.
This comprehensive guide should equip players with all the knowledge needed to uncover every treasure and maximize their rewards in "Sanctum of Prophecy" Janusopolis. Happy hunting!To uncover the treasures within "Sanctum of Prophecy" in Janusopolis, begin by teleporting to the gate space anchor. Upon arrival, direct your gaze to the left where a basic treasure awaits.
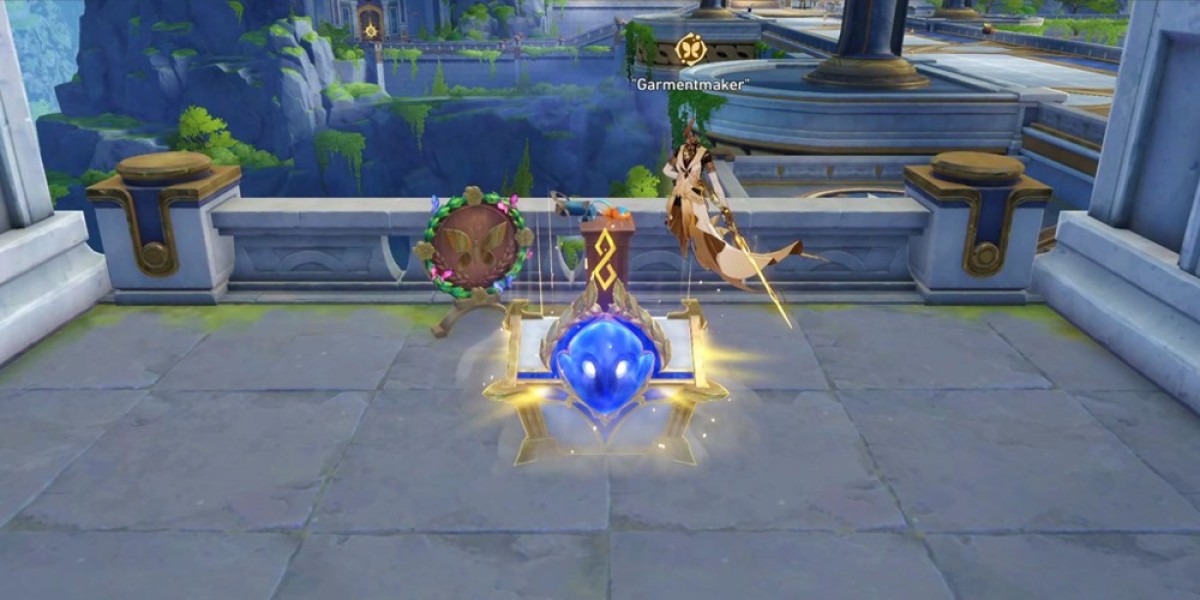
The final treasure chest in this area is accessible only after you gather all 10 nymphs. Once you've collected them, return to the garmentmaker located near the destiny's gate space anchor. Upon your return, you'll notice a small hand of Zagreus positioned next to the nymph on the platform.
Next, take the nearby elevator down to the lower level. Here, you will take control of the hand of Zagreus. Your task involves maneuvering the mechanical hand through eight circles that are visible on the wall. Make sure to follow this precise sequence to unlock the treasure: 3 - 1 - 4 - 1 - 5 - 5 - 2 - 6.
Oneiric Shard: Usage and Acquisition
Oneiric Shards are a vital resource in Honkai Star Rail, utilized for upgrading and enhancing the skills of Valkyries and Stigmata to boost their power and abilities. Players can obtain Oneiric Shards by topping up on game trading platforms, providing a direct and efficient route to enhancing their gameplay experience. These platforms facilitate the purchase of Oneiric Shards using real currency, allowing players to unlock exclusive items and elevate their characters' potential in the game.
Buy Oneiric Shard from LootBar
If players are looking to top up Oneiric Shards for upgrading Valkyries and Stigmata in Honkai Star Rail, they may want to consider using the lootbar game trading platform. This platform, known for its global reach and professional service, ensures a secure and convenient gaming transaction experience for users. LootBar offers a range of services including game top ups, item trading, and more, catering to popular games like Honkai Star Rail, Genshin Impact, and others.
One of the standout advantages of choosing LootBar is its 24/7 online customer service, which provides players with assistance anytime they need it. With various payment methods available, players can enjoy ease and flexibility in their transactions. Furthermore, LootBar regularly offers promotions and discounts that make topping up Oneiric Shards not only easy but also more affordable. Players can benefit from discounts reaching up to 20%, enhancing the value they receive with their purchases.
Using lootbar.gg for topping up Honkai Star Rail ensures not only a safe transaction but also cost-effective benefits. The platform's commitment to providing professional service means players can focus on advancing their game without worrying about transaction security. Whether players are seeking hoyoverse top up Honkai Star Rail or other gaming services, LootBar is equipped to meet their needs efficiently and reliably.
How to Top Up Honkai Star Rail on LootBar
To initiate the Star Rail top up process on the LootBar trading platform, go to their official website at https://lootbar.gg . Once there, select your preferred language and currency type, and log in to your account. Navigate to the top-up section and select the game you wish to enhance, which in this case is Honkai: Star Rail. Here, decide on the amount of Oneiric Shards or Express Supply Pass you wish to purchase, and proceed by clicking "Top-up Now".
Following this, you will be prompted to choose your server and enter your Star Rail UID along with your Character Name. After providing these details, click on the Top-up button. You will then be directed to select a payment method that suits your preference and complete the payment process. By following these steps, you can seamlessly enhance your gameplay experience by upgrading Valkyries and Stigmata skills in Honkai Star Rail.